

There’s something unmistakably grounding about a loaf of sourdough rising quietly on the counter overnight. It’s the kind of recipe that softens the edges of a busy week and brings a sense of nourishing, homemade comfort back into the kitchen. This sourdough sandwich bread has that tender crumb we all love for toast, grilled cheese, and simple family lunches a wholesome, balanced comfort cooking moment that turns an ordinary day into something warmer.

The long, gentle rise makes the dough incredibly soft, giving you a loaf that feels like a cozy weeknight meal waiting to happen. And because the recipe uses just pantry basics, it becomes a surprisingly budget-friendly dinner companion, perfect for meal prep or layering with protein-packed fillings for a high-protein lunchbox moment. Whether you’re setting it out for Sunday brunch or using it to prep sandwiches for busy days, this loaf leans into that nourishing, nutrient-rich feeling we crave.
There’s beauty in how simple it is a small bowl, a bit of time, and you end up with homemade bread that fits easily into a family-centered routine. A humble recipe that works no matter the season, offering both comfort and practicality.
Ingredients You’ll Need
Sourdough Base
- ⅓ cup sourdough starter (65 g), discard or fed 12–24 hours prior
- 1⅓ cups warm filtered water (300 g), around 95–100°F
Flavor & Texture
- ¼ cup granulated sugar (56 g) or 2 rounded tbsp honey
- 4 cups bread flour (500 g) or all-purpose
- 1½ tbsp extra-virgin olive oil (20 g)
- 2 tsp fine salt (9 g)
These simple ingredients come together to form a loaf that’s wonderfully soft but sturdy enough for sandwiches great for meal prep for busy days and adaptable for diabetic-friendly choices when using honey or reduced sugar.
How to Make It
Mix the Starter and Water
Start by adding your starter to a large bowl. Pour in the warm water and sugar, stirring until it all dissolves. This early mixing creates a quietly nourishing homemade meal foundation, the base of your tender crumb.
Bring the Dough Together
Add flour, oil, and salt. Stir with a dough whisk or spoon until the dough becomes shaggy and thick. Touch it with floured or damp hands, pulling everything together. It’s rustic and imperfect exactly as it should be for cozy, balanced comfort cooking.
Give It a Rest
Cover the bowl with a clean, damp towel and let the dough rest 30–45 minutes. This quick rest lets the flour fully hydrate, helping your loaf bake up soft and airy while still satisfying enough for a high-protein lunch when paired with your favorite fillings.
Stretch & Fold for Strength
Coax the dough from the bowl, stretching and folding it in gentle quarter turns until you’ve formed a full circle. This adds strength without kneading, helping create that pillowy interior perfect for a family dinner idea or simple toast on a chilly morning.
Let It Rise Overnight
Return dough to the bowl, cover again, and let it rise 4–12 hours. This slow fermentation brings depth of flavor while keeping the recipe naturally adaptable for gluten-free adjustments if you’re experimenting with alternative flours.
Shape the Dough
In the morning, dust your counter lightly with flour. Dimple the dough to release air, then roll it into a log. Let it rest for 10 minutes. This pause makes the loaf easier to shape and gives it that classic sandwich silhouette.
Tighten & Pan
Spray a loaf pan, then gently tighten the dough by pulling it toward you across the counter. Nestle it into your pan, seam down. Cover and let rise 1–2 hours, until doubled a calm, unhurried step that fits easily into a relaxed weekend or flexible weekday routine.
Test & Bake
Press the corner with a fingertip if it keeps the indentation, it’s ready. Bake at 375°F for about 40 minutes, brushing with egg wash if you want that golden, bakery-style finish.
Cool Patiently
Let the loaf cool 10 minutes in the pan, then move it to a rack. Waiting the full hour before slicing is the secret to keeping it tall and soft, ensuring even slices for those low-carb alternative toppings, hearty sandwich stacks, or morning avocado toast.
Cozy Tips & Serving Ideas
- For meal prep: Slice the loaf once cooled, then freeze in small bundles. Perfect for grab-and-go sandwiches all week.
- Diabetic-friendly tweaks: Swap sugar for honey or reduce sweetener slightly the long ferment naturally softens the flavor.
- Gluten-free thoughts: While this recipe uses wheat flour, you can explore certified gluten-free sourdough starters and flours for a softer, gentler loaf.
- High-protein add-ons: Layer with turkey, cottage cheese, or nut butters for a protein-packed lunch.
- Budget-friendly dinner pairing: Serve toasted slices with a warm bowl of soup or a simple skillet meal for an easy, affordable comfort dinner.
- Family-style servings: Turn leftovers into French toast, grilled cheese, or little breakfast sandwiches the kids will love.
- Low-carb adjustments: Slice thinner or pair with vegetable-forward spreads for a lighter option that still feels indulgent.
A Final Cozy Thought
There’s a deep kind of joy that comes from slicing into a loaf you made with your own hands warm, soft, and filling your kitchen with that timeless bakery scent. Save this recipe for the days when you crave something grounding and homemade, and share it with someone who loves a simple, comforting slice of sourdough warmth.
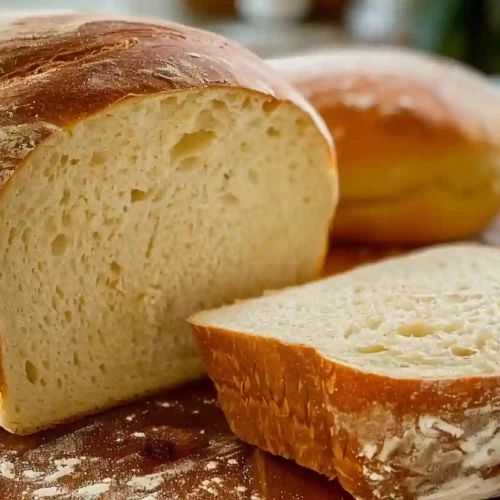
sourdough sandwich bread
Equipment
- Loaf pan 8×4 or 9×5 inch loaf pan for baking the bread.
Ingredients
- 1/3 cup sourdough starter (65 grams), discard or fed 12–24 hours prior
- 1 1/3 cups warm filtered water (300 grams), 95º to 100ºF
- 1/4 cup granulated sugar (56 grams) or 2 rounded tablespoons honey
- 4 cups bread flour (500 grams) or all-purpose flour
- 1 1/2 tablespoons extra-virgin olive oil (20 grams) or preferred cooking oil
- 2 teaspoons fine salt (9 grams)
Instructions
- Add the sourdough starter to a large mixing bowl. Pour in the warm water and sugar (or honey), stirring until the starter and sweetener are dissolved.
- Add the flour, olive oil, and salt to the bowl. Stir with a dough whisk or wooden spoon until a thick, shaggy dough forms.
- Flour or lightly wet your hands and finish mixing the dough by hand until most of the flour is absorbed. It is fine if some flour remains on the sides or bottom of the bowl.
- Cover the bowl with a clean, damp kitchen towel and let the dough rest for 30 to 45 minutes.
- Coax the dough from the bowl and stretch and fold it by pulling a section up about 4 inches, then folding it down the middle. Turn the dough 1/4 turn and repeat, working around until you form a full circle of folds.
- Return the dough to the bowl and cover with a damp towel (or plastic wrap in a dry climate). Let rise at room temperature in a warm area for 4 to 12 hours, until noticeably risen and puffy.
- Lightly flour your countertop. Gently turn the dough out and stretch it into a loose rectangle. Use your fingertips to dimple the dough and release excess air.
- Roll the dough up into a log shape from one short side to the other. Cover and let the log rest for 10 minutes.
- Spray a loaf pan with cooking spray. Gently tighten the dough log by pulling it toward you along the counter 5 to 8 inches. Place it in the loaf pan seam side down. Cover and let rise 1 to 2 hours, until about doubled in size. Press the corner of the dough about 1/2 inch with a fingertip; if the indentation remains, it is ready to bake.
- Preheat the oven to 375ºF. If desired, brush the top of the loaf with an egg wash. Bake in the center of the oven for about 40 minutes, until the top is golden. Cool in the pan for 10 minutes, then transfer to a cooling rack. Allow the bread to cool at least 1 hour before slicing.